Monday, November 28, 2016

Nuts about Nutcrackers

I love Nutcrackers.  This year I decided to put almost all of my collection in the dining room.  This is the only room that I have gotten decorated so far.  I had good intentions this last weekend to get all of my decoration done for Christmas but it didn't work out. I tell you all about it later in this post.  Now, lets take a look at the dining room.


I got these nutcracker plates at Pier 1 just to use with all of these guys.  The plate is glass so the green color of the plate below it shows through.


I was taking these pictures this morning as my dining room stays pretty dark most of the day.  I used 4 nutcrackers for my centerpiece on the table.


Here are all four nutcrackers.

Now for the buffet.  I even decorated the mirror this time.


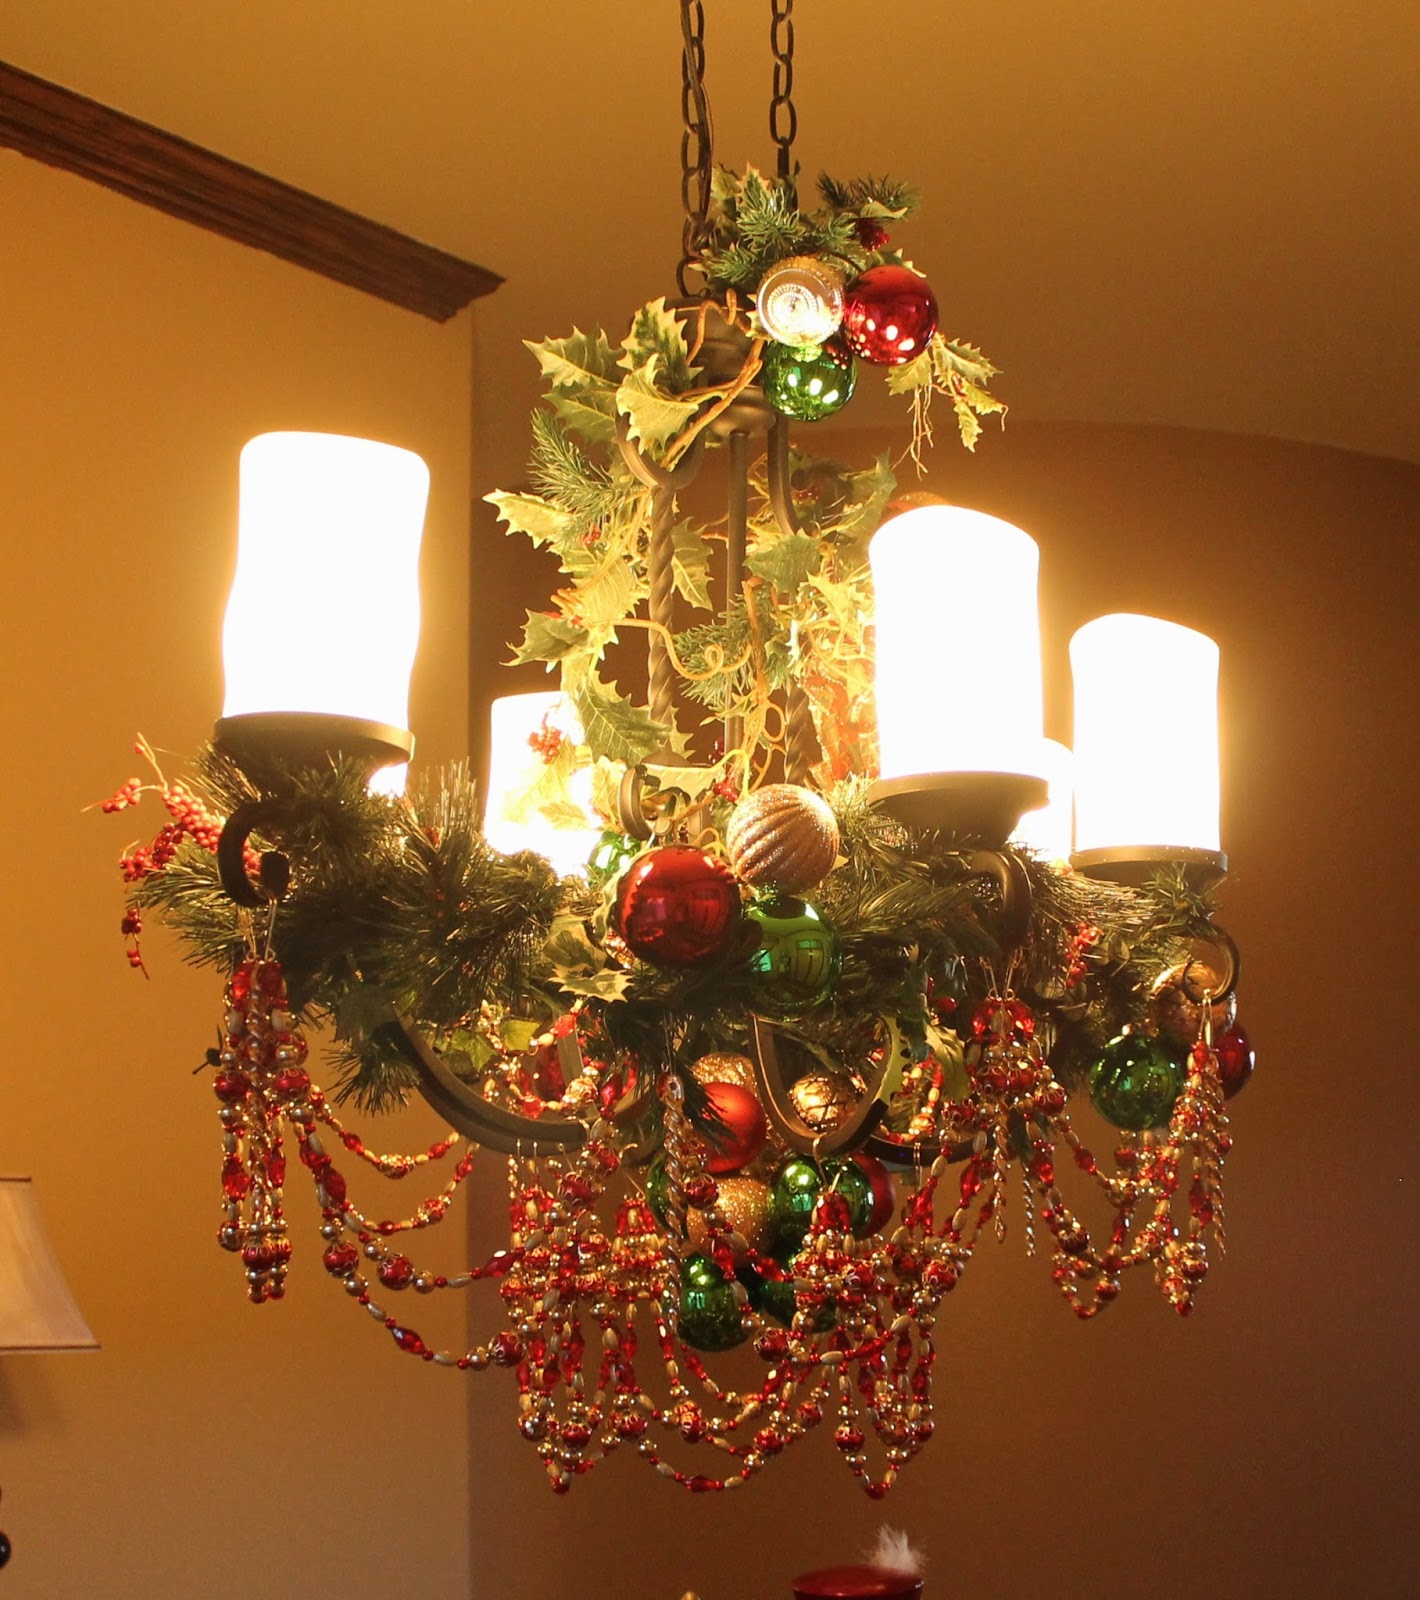
Now for my favorite piece in the room-the chandelier.  I had to have the lights on so these are the best pictures I could get.


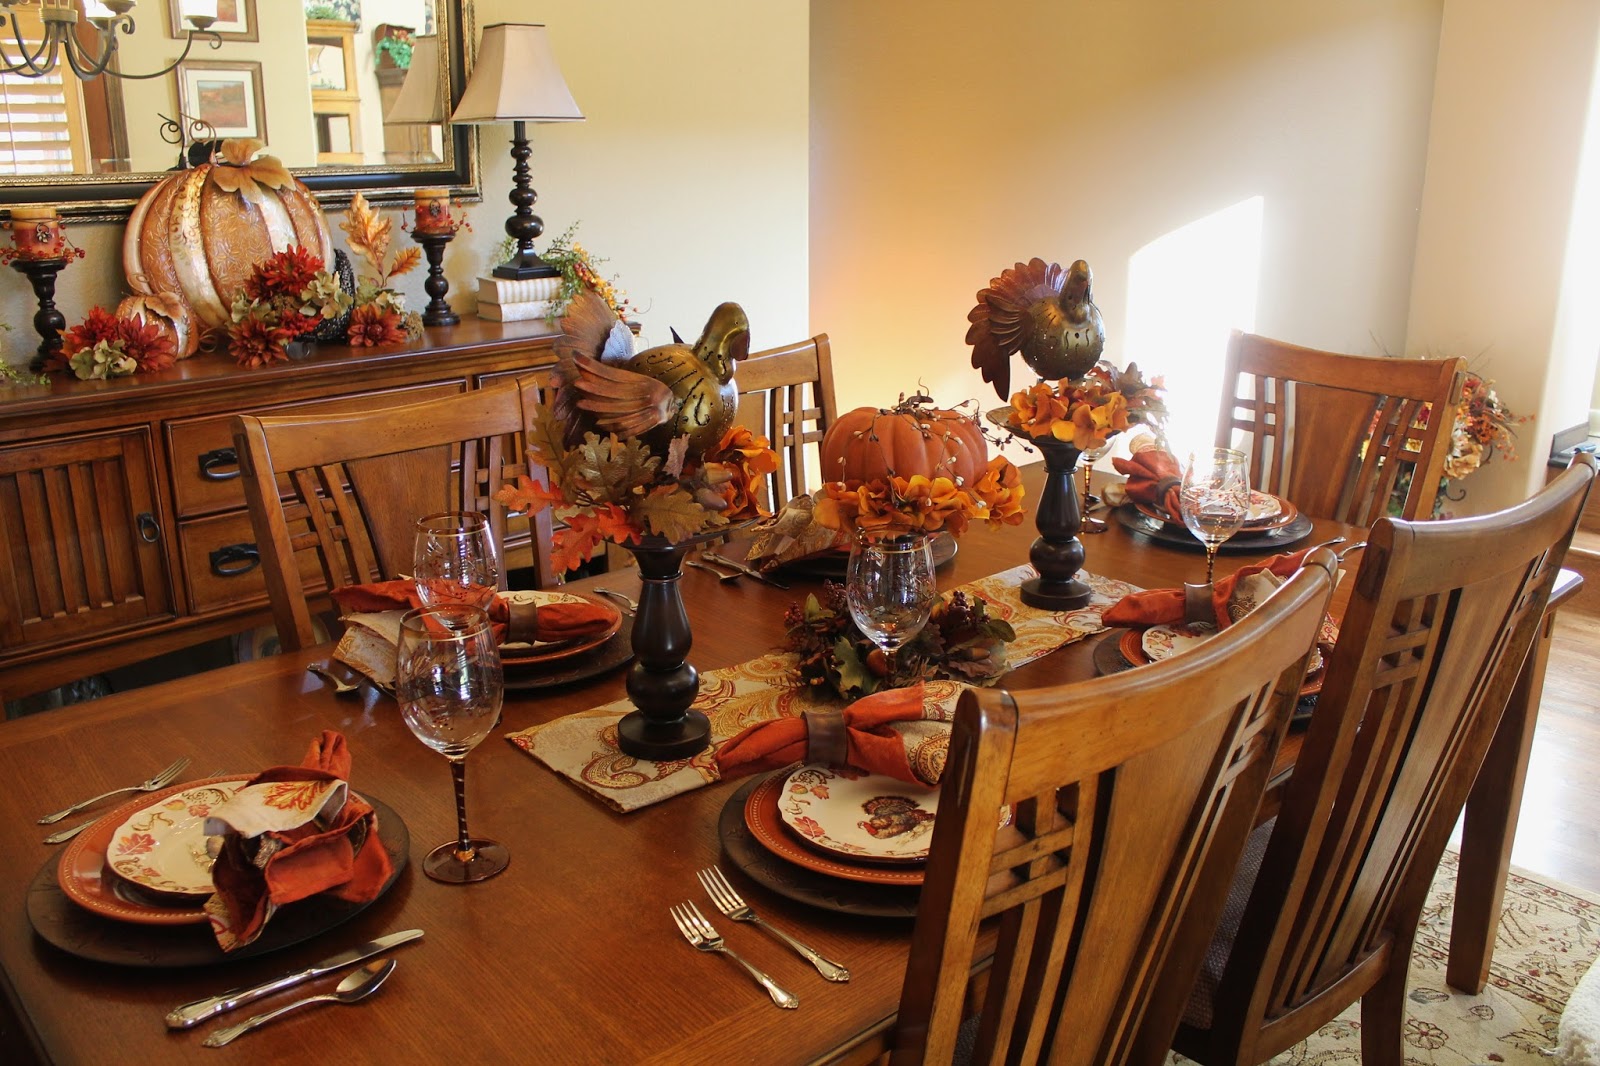
So this weekend I had planned to get more done but it took me longer on Saturday to take down all of the Fall decor than I had planned.  I was able to bring all the Christmas bins up from the basement that day and do some sorting.  Sunday is a different story.

So the hubby decides that he wants to get the outdoors done.  We thought it would be a good idea to get the laser spot lights instead of stringing lights on the evergreens in the front yard.  So I go to Home Depot and buy some.  On the way home I decide to go to Wal-Mart to get some laundry supplies and check out the Christmas decor.  I found a cute snowman, puppy dog and set of 3 presents that light up and thought would look good in the front yard also.  I ended up spending most of my afternoon getting those put together.

They went up pretty quickly and I got them plugged in and wouldn't you know that the snowman didn't all light up.  Of course it was the only one they had left.  So my hubby who used to be an electrician looked at it. He tried to hard wire it but the other half was fried.  Now I couldn't take it back since he cut the wires so he tells me to just re-string the other sections with some lights we already had.  Easy enough right.  Wrong.

I found two strands and plugged them in.  They both looked like they worked so I picked the longest set and started re-stringing, took it outside and plugged it in.  Guess what.  Only half of the strand worked. I had to unstring it and start all over with the shorter string set.  I plugged it in before I started and it worked.  I had re-strung the middle section and started on the head when I realized that the middle section was upside down.  So I had to unstring again and start all over.  I finally got it restrung, set back up and plugged in.  Oh, did I mention that it was cold and very windy all day Sunday.  I spent about 3 hours outside working on all the lights and they still didn't get all done.  When I came inside it felt like my whole body was chapped.  Note to self- start earlier when it is warm.

Linking with
Our Home Away From Home, Coastal Charm, My Uncommon Slice of Suburbia, Dwellings The Heart of Your Home, StoneGable, Julie's Creative Lifestyle, A Stroll Thru Life, Oh My Heartsie Girl, Celebrate and Decorate, Savvy Southern Style, 21 Rosemary lane, Have a Daily Cup of Mrs Olson, DIY by Design, Katherine's Corner, Posed Perfection, Rooted in Thyme, Imparting Grace, Between Naps on the Porch, A Delightsome Life, Mila's Little Things, Shabby Art Boutique, The Charm of Home, DIY Vintage Chic, Shoestring Elegance, Chic on a Shoestring, French Country Cottage, Craftberry Bush, Pieced Pastimes, Scrapality, Life on Lakeshore Drive, Rustic & Refined, My Soulful Home, Finding Silver Pennies

Wednesday, November 23, 2016

DIY Candy Canes from felt balls

So the other day I was in Home Goods looking at all the wonderful Christmas items that they had and came across these garlands.


First thing I thought was "these would make great candy canes."  Easy enough, I thought, just take off the balls and slid them on some floral wire that I already have.


I just cut the string on the garland and pulled them off.  Then I bent the end of the wire so it will hold the ball.  It started out easy but then some of the balls just wouldn't slid down the wire.  I actually had to take a nail and hammer it through the ball to make a bigger hole.  Let me tell sometimes it took a lot of effort to get that nail through the ball.  Once I got all the balls on the wire I bent the other end to secure the balls.  Then I bent it into the shape of a candy cane.  A wire clothes hanger would work for this also.
So far I have made two candy canes.  I bought two boxes of garland and I am hoping to get at least 6 made.  I am wanting to put them with some greenery in my Santa boots planter.  Here are the finished two canes.


Now for an update on my new Christmas tree in the living room.  I finally got all the branches fluffed.  It only took me an hour and multiple scratches on my hands and wrists.  Now it is ready for me to decorate this weekend.


Here is what the tree looked like when I first put it together.


As you can see it made it look much bigger.


Linking with
DIY by Design, Mila's Little Things, Scrapality

Sunday, November 13, 2016

french country hutch redo

This weekend I decided to tackle my hutch.  It isn't really a true hutch as the top and bottom don't match.  I was wanting to get this done before I start decorating for Christmas since it is next to the tree.  So here it is.  I think it turned out pretty good.


The bottom is different than it was before.  This is another sofa table that was a little smaller then the other one that I used.   I think this one works better with the top piece.  I was in such a hurry to get this painted I forgot to take before pictures.  Here is a picture of the hutch the last time I decorated it for Christmas.  You can see that the bottom table is different and I also painted the inside of the top a lighter color.  It was a dark mocha color before.


I finally found a picture of the sofa table before I painted it.  It is from 6 years ago with my late little Toby dog under it.  He always liked to hide there thinking I couldn't see him.  I miss the little guy.

You can see that it was kinda of an ugly color.  I never liked it but my husband did so I compromised.  Now I need to get it ready for Christmas.  I better get started on fluffing the tree now.

Linking with
Between Naps on the Porch

Thursday, November 10, 2016

O Christmas Tree

Have you ever seen something online, order it and when it arrives say "what was I thinking"?  This is just what happened to me.  I wanted a taller and wider Christmas so I searched online and found one that I thought would be perfect for the formal living room.  For some reason 9 ft tall and 72 inches wide didn't seem that big to me.
When it arrived the box didn't look all that big (about 6 ft by 2 ft).  So I tried to pick it up the handles and boy was it heavy.  I couldn't lift it at all.  I had to basically roll it into the house.  I opened the box and found that it was in 4 parts.  Let's just say that they were all heavy except for the top piece.  I had to stand on the 4 foot ladder to put the top piece on.


I know that it doesn't look quite right, that is because I haven't fluffed out all of the branches.  I can hardly wait. Not, I am thinking that this will take me a few hours.  I will have to make sure that I wear long sleeves since the tree broke out my skin just setting it up.


I like that it is pre-lit with clear lights.  I hate stringing lights.  Maybe in my spare time this weekend (ha, ha) I can get those branches fluffed.  I am already envisioning it decorated with green, red and white decorations. 

Saturday, November 5, 2016

Tuesday, November 1, 2016

Visions of sugar plums

Now that it is November I am finding myself thinking about Christmas.  I hate to rush holidays but I need to be thinking about how I am going to decorate this year.  Since I host Thanksgiving at my house I don't start Christmas decorating until the day after.  Not only am I searching Pinterest to give me ideas but my own past decor.  Here are just a few that are giving me some inspiration.
These are from our previous home.


These are from our current home.


Linking with
Shabby Art Boutique